Sunday, July 17, 2011

They're Not Just Clothespins...

I have an obsession with these little clothespin things ever since we made them in a Paper Source Workshop a few weeks ago.  In the class, we used regular 12 x 12 cardstock and double sided tape or the Baby Xyron.  For my own purposes at home, I used very fun label paper that I found at Michael's. 


I use them for lots of things. They're super fun.

Wednesday, July 6, 2011

DIY Anthropologie Knock Off Stone Jewelry

I have a secret place to buy fabulous jewelry cheap cheap cheap in Houston (don't ask me where it is, I'm stingy and it's my secret and I won't give it up or else y'all will start going there, they'll raise their prices and my secret happy place will be gone).  I went there a few weeks ago after taking a walk through Anthropologie...I love Anthro. I really do, but their prices are outrageous.  Especially for accessories that cost pennies to make. So I hit up the happy place...

I got lots of stuff that day...lots of wrap bracelets (LOTS of these. I love them and wear them everywhere since they don't dangle and I can craft while wearing them) and this very very very adorable pig ring. I love my pig.

The Pig and I At A Bat Mitzvah...
I was really on the hunt for a stone pendant necklace. Remember when you were a kid and you went to the museums on school field trips and they had those huge rocks for sale? Well, now apparently it's cool for you to wear them as necklaces and rings...I'd found THISTHISTHIS and most especially THIS one in my travels and I wanted one. Or three...

That last one is so cool that it deserves its own pic...
Anyway, so I found this one necklace that had several different stones on it. While I kind of liked it how it was, it was too big. It's 110 degrees here in Houston, TX, there is no way I'm wearing something that involved around my neck in the summer...

As it started. They even included a free pair of earrings that I have yet to re-create...
The happy accessory place had a clearance section (I almost fell over) and I bought a bunch of ugly necklaces for under $1 each just for the cords...Then I took out my handy needle nosed-pliers (my dad would be so proud that I know the proper name for my non-powered tool. Hi Dad!) and snip snip snipped them away from the regular necklace, then I put them on the free cords and was almost done...

Here they are being almost done...

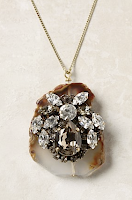
I got super excited when I saw the embellished stone at Anthro, so I used some cool stones that I got from the asylum, an earring that has seen better days and the very smelly but useful E6000 glue to create this gem.


I also really liked the black stone on the original necklace too much to make it a necklace, so I made it a ring using the leftover rings from THIS blog project. 

Like my rock?

All of this from one necklace that cost me about $15. Maybe $20.


Tuesday, July 5, 2011

DIY Nautically Rope Belt

I was very inspired when I saw THIS blog post while I was blog stalking one day...Why was I so excited? Why, by my love of all things beachy of course-duh!!!!  I got a whole big bunch of nautically rope at the Asylum one day and was dying to use it. I also have an obsession with big belts, so this one was perfect for me.

Besides the rope, I used some generic off white ribbon, off white felt and my all time favorite hot glue gun...

I used hot glue to curl the rope around in a circle.

I wanted to make sure the middle circle was bigger than the side circles.

So I traced them on the side to make sure they were the same size...

When they were done I cut them out...

Then I cut a long piece of ribbon and hot glued it to the back. 

Does this need some embellishment? I haven't decided yet.

Pocket Watch Necklace (It's Sort Of Vintage...)

A few weeks ago, I found myself in one of my favorite places, TEXAS ART ASYLUM.  I bought lots and lots of fun things to re-create. Oh it was such fun!!!  I was really looking for a pocket watch.  I've been eyeing several necklaces (HEREHERE and HERE), but really wanted to make my own ever since we got THESE cuties at PS...

Supplies! Look at the Statue of Liberty on my pocket watch!

I covered her cloudy day with flowers. So much better. 

OOOO up close!

With a chain. I need to put a pink bow at the top. I wore it the other day though and totally forgot to do this...


Smash Smash Smash Away!


I have been absent lately and I apologize. I think I didn’t realize how many people read my blog…so thanks for the emails and Facebook comments. I’m thinking of changing this blog from Blogger to Wordpress. For some reason I can’t comment on posts and that’s just ANNOYING…Soccer Mom, if you’re reading, thanks for commenting on my DIY Chanel Ice Cube Clutch…I’m considering making the clear box one.

OK, onto the crafting that I’ve been doing but not blogging about…

First, I had a great impromptu weekend in NJ with the fam. Hello Fam!  It was so nice to see all of you…While in NJ, we took a day trip to see the Civil War Re-enactment in Gettysburg, PA.  It was riveting and that's all I'm going to say about that.  I'm so excited to chronicle our trip in my sort of brand spanking new SMASH book…OMG. Have ANY of you Smashed lately????  It's like scrapbooking for novices. I LOVE it!

This is my first Smash Book...I have since purchased another one with a black binding. 

I’m going to preface this entry by saying that I am NOT a scrapbooker. I have nothing against scrapbookers per se, but I just can't get into it. And I get bored. Smash is different. It’s very cool and easy. Essentially, it’s a binder with fun pages in it. In order to maximize their profits, the Smash company (who I actually think is K & Company) has created all sorts of things to go with it (fancy post it notes, huge rubber bands to hold that sucker together when it gets too big, and fun masking tape with sayings on it-to name a few). All they want you to do is “smash” stuff in there. There is a pen/glue stick attached to the side of the book, making it super easy to smash away. 

I’ve read about this smashing phenomenon on the Archiver's Blog and OF COURSE from the PAPER SOURCE BLOG. We have one of these books at our demo table and we’ve each created a page. Mine was about extreme couponing and it’s super fun. Maybe I’ll take a pic of it this week and put it in here…

Anyway, here are some smashing pics…
I don’t know if you can read this, but this is what they suggest you do with your Smash Book.
   
And this is the first vellum page that you see when you open your Smash Book.


This is one of the very cool props that you can use with your Smash Book. It’s a date stamp. I love that you can put, “Oh, Snap!” next to your date entry.

My first page. I attempted to copy the Extreme Couponing one that I did at the store, but I was tired. I’m still working on it though…