Monday, January 31, 2011

Book Binding

I'll apologize in advance for the length of this blog.  I'll try to make it interesting by adding lots of pics...

When I first started working at Paper Source, we were put through an amazing training program. We learned all sorts of crafting techniques and it was seriously the most amazing week of my life. One of the things that I was most excited to learn was book binding.  I'm sorry, but it is the COOLEST of all things crafty.  It was also the most stressful craft that I have ever done ever. It's very involved and there is lots of glue and lots of ways to mess up and frankly lots and lots of f-bombs. So of course, I had to master it.  I try to do a book a week now and I think I'm getting quite good at it (if I do say so myself). 

Lets start at the beginning-supplies. To make it easy, here's a list:
  • PVA/Methyl Cellulose mix (60% PVA to 40% Methyl)--The Methyl makes the PVA dry sllloooowwwwly so that you have time to mess up and move paper around.
  • Your favorite papers to cover the front and back
  • Book cloth to match OR book cloth tape (that's what I used), you'll need two of these, one smaller than the other.
  • Ruler
  • Pencil or other writing utensil (tip: if you're using dark paper, make sure your pencil marks will be seen on it)
  • Exacto knife
  • Paste brush that looks like this
  • Book binding kit OR a text block (that you can make yourself) AND book board cut to match (cutting book board is a big pain in the butt, so I buy the kits)
  • Lots and lots of scrap paper to cover your workspace, you'll need big and little pieces. I re-use ripped up paper bags.
  • Wet wipes and a rag to wipe your hands on
  • Teflon bone folder (you can use the other kind, but it might make marks on dark book cloth, also, this one is much better because it's a bit heavier and has more edges to smooth your paper)
And some other things that I used for this project:
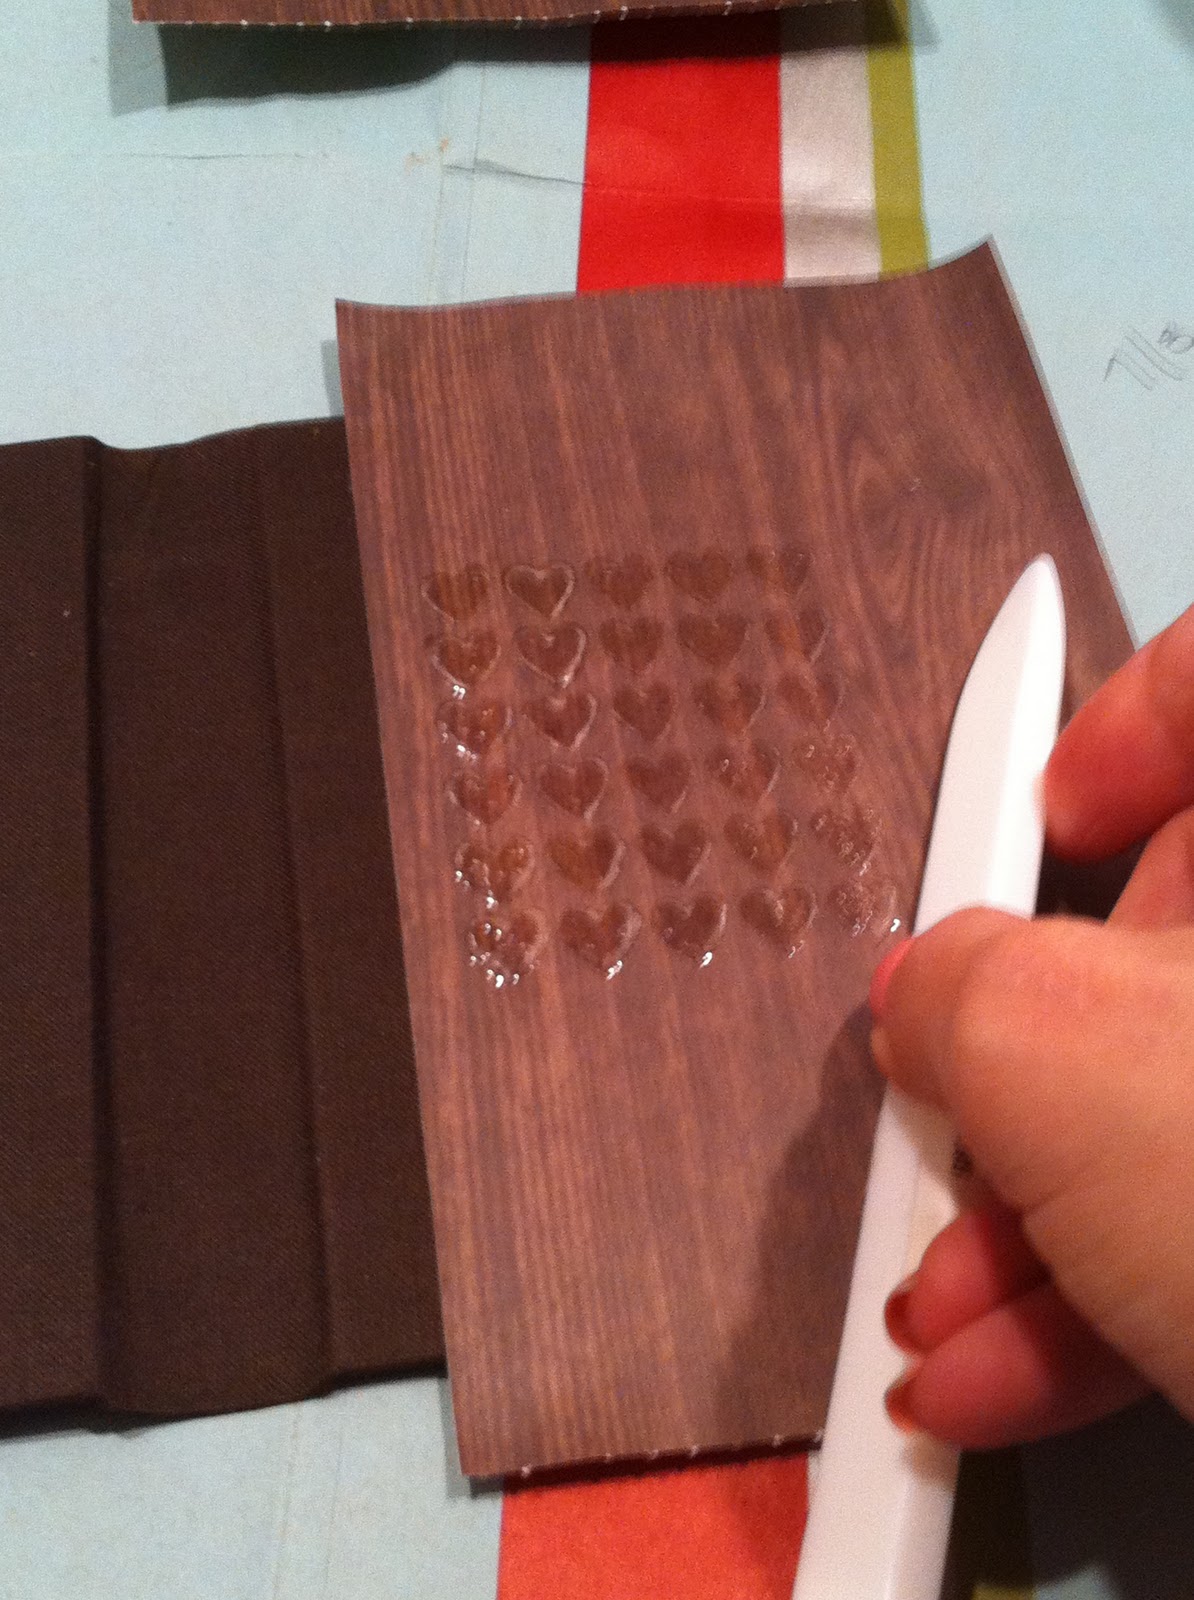
With the embossing powder on the
stamp before I heat set it. 
After it was heat set.
It looks very watery...
To start, I heat embossed my favorite heart stamp onto the paper that looked like wood from the Martha pad. For this project, I purposely used the ultra thick embossing powder because it almost looks like a resin when it seals. I wanted it to look like water on wood, only heart shaped.  After that was done, I had to cut it down to fit the book boards. I guess I could have heat embossed it after I cut it, but I avoid measuring at all costs and so I procrastinated until the last possible minute.

My not yet messy workspace.
You can see the pencil
marks and the fold at the
top of the book cloth tape.
 One thing that I forgot to mention was the importance of scrap paper or brown bag paper to use in your workspace.  For bookbinding it's critical to have enough to cover your space two to three times and to have a lot of other little scraps to cover glue marks.  The PVA/Methyl mix DOES NOT COME OUT of book cloth, so you have to be very careful not to leave any wet on your desk or wherever you're working...I'm getting ahead of myself.

Now onto measuring...like I said, it's my least favorite thing and I do it the least amount that I can get away with. It doesn't really matter anyway, as long as your paper is not really big or really small...Now book cloth or book cloth tape is a different story. You need to measure this or else you can really mess up your project. To make this very simple, I measure the width of the book boards  and the text block and add 1/8" to it. Write that down number on your scrap paper so that you remember it. Take your book cloth tape and make a tiny crease at the top and a tiny crease at the bottom. Find the middle of it and mark equally out on each side (see pic), from one mark to the other should be your measurement that you wrote down. Do this on both the top and bottom of the book cloth tape. Then I draw two lines connecting both marks and then I put the book cloth around the boards and the text block just to make sure they all fit together nicely (there should be a bit of room left).

Keep it level people!
See how much I hate measuring,
not one of those edges are straight
sigh...
Construct your spine by peeling away the book cloth tape on one side and place your first book board with at least an inch left at both the top and the bottom. Do the same thing with the other board, on the other side. Use a ruler to make sure that both boards are level or your book will be really uneven and look really funny...Use your bone folder to get all the air bubbles out and to make it stick really well to the boards. Peel away the rest of the sticker paper if you haven't already and take your second piece of book cloth and stick it in the middle. Again, use your bone folder to make it smooth, make sure to really get into the edges and corners.

A spine is born! 
Once your spine is done, fold it in half and press it to one side (see pic, I can't explain this very well) so that you can accurately measure from the spine out. For this book, I wanted 1/2" of the spine to show, so I measured out from the edge and drew a faint line down the side as a marker. I did this on both sides (of course).

Boring stuff over, now it's time to glue.  If you've cut your paper, make sure you mark which edge is straight, this is the one that you are going to want to place on the line that you just drew on the book cloth.  I mention this now, because you're about to glue your paper and won't be able to handle it much or write on it after that's done...

The other side of the paper was so pretty!
Glue from the center of the paper out and go off the paper when you do it. Your paper is going to curl but make sure that it doesn't move on the scrap paper because you'll get glue on the opposite side of the paper and that will stink. Your fingers are going to get super gluey, but that's why you have wet wipes and a rag to wipe them on.

See the corner?
Once it's all glued up, take it and immediately put it onto the book board, being careful to match it up with the line on the book cloth. There should be an inch-ish of paper overlapping the other three sides. Before you turn it over, take your Exacto knife and cut the corners as shown in that picture. Be careful not to cut too close to the book board corner, leave about 1/4" from the edge. Turn the whole thing over and use the bone folder to smooth out the wrinkles. This is really important, you have to get the extra glue out of there...
Smooth smooth smooth!

Wow, this entry is really long...OK, we're almost done.  Fold the long side over, smoothing the whole way with your bone folder. Take the corner of the bone folder, and stick it in the corner of the paper to make the edge smooth (see pic, I'm not explaining that well either), once this is done, pull the edge up. Repeat on the other side. Then repeat this entire process on the
The corner thing...
second side of the book.


Both sides paper'd up.
Whoo hoo!  We're almost done!!!!

You can kind of see the mark, it looks like a hole
in the corner. 
Turn the book board over and measure 1/8" out from each side. You don't need to draw lines or anything, just find the outside corners.

Then glue your text block the same way you did your papers (center out).
All glued up and ready
to be stuck!!!

Place the pages on either corner mark and CAREFULLY shut the book. Don't let anything in there crease, use your bone folder to make it smooth. This is tricky, I know. It gets me sometimes too...

Glue up the other side and do the same thing. The second side is always a bit difficult because you can't see as much as you can on the first side.


And you're done!  Now take a picture, so that you can remember what it looks like, and then you have to wrap it all up in wax paper and put it under something heavy (I use my wedding album...) and leave it there to dry for a full 24 hours.


This was a really long entry, so if you got this far, thanks for reading and if you skipped to this part, thanks for lookin' at my pics!

Sunday, January 30, 2011

Iron on Heart...(This blog is rated MA for Mature Adult)

After yesterdays debacle, I had a hard time coming up with an idea for today's heart.  In fact, it was so bad that my husband even doubted my ability to get it done today. Hater. When I started this blog, I said that if I didn't have an idea when I woke up, something would come to me as the day went on and it would be totally right. And I was totally right about that, because I did get an idea and it was great.

In my "normal" life (and I use the term normal loosely as our life is anything but) my husband and I own bars and nightclubs.  We popped into one of our bars, Bayou City Bar & Grill, on our way home tonight and found a friend of ours in a state. He'd just broken up with his girlfriend. So sad...Well, for his birthday a few months ago, I promised that I would make him a shirt that said "Manwhore" (hence the reason for the MA rating of this blog, that and my use of the word "crap" down below-but I digress, please continue reading...), but he started dating this girl and I never got around to it.  So of course, when I hear about the break up, I instantly recognize an idea for a heart (phew, crisis averted, we were getting close to the wire as it was nearly 10pm)!!! It was time for me to make that shirt. Bar people love stuff like this, so I think that my idea is going to go over in a really big way.  I also think that this person (who shall remain nameless, because, well, I didn't really tell him that he was going to be featured as my blog person of the day) will be so honored that I thought of him in his time of need.

See the heart on the end? It's
teeny-tiny which is very fitting
for a "Manwhore" t-shirt.
I had already bought the stuff at Michael's a few months ago, so I pulled it out of its hiding place, dusted it off and gathered the rest of my supplies (scissors, iron on letters, t-shirt, ruler and iron).  I carefully cut out the letters (which are fuzzy, red and pretty fun) and placed them on the shirt.  I never follow directions (as evidenced by yesterday's drama), I know that they tell you to wash and iron the shirt first, but I didn't have time for that, so lets just hope for the best with future washings. Anyway, I measured (which I'm not a fan of, measuring is no fun) and placed each letter in a happy little line. Then I took the dot from the question mark in my iron on letters pack and trimmed it to make a little heart.

I grabbed an old tank top to use as a pressing cloth and I started to iron on the letters for 20 seconds as indicated on the packaging.  I'm not sure how many of you have actually done iron-on's before, but those directions are crap.  It takes WAY more than 20 seconds for those things to melt and it rarely ever happens with a pressing cloth which is why I ditched mine really really quickly.

Ahhh, much better...
It took awhile to get most of the letters on there, but I patiently ironed each of them on, not wanting a repeat of yesterday.


The final product. I really think he's
going to love it. Sorry the picture kind
of stinks...

  Side Note: I totally meant to do that with the "E"

A heart shaped shredded paper bowl...

Last night marked my first ever heart crafting disaster.  It all started at around 5pm, I had my project all planned out, it's actually one that I've been wanting to do for awhile, so I pulled out my book to get started.  There's the book, down there...


Supplies!
This is when I thought I was
actually going to make
two of these guys.
Ha!!!
The not wet enough paper strips
The project is actually those bowls on the cover. I wanted to make two heart shaped nesting bowls. I gathered my black card stock and cut it into strips using a paper cutter, PVA glue, Martha Stewart heart punches and heart shaped bowls. The directions said to cover the bowl in saran wrap.  Here is where I made my first mistake...I had some special kind of saran wrap that wasn't very saran wrappy...but I decided to go with it anyway. Then I took a PVA/water mixture and covered the bowls with it. The directions said the make the paper scraps damp, so I put them in a separate bowl and threw some water on them. In retrospect, I probably could have used a bit more water on them but for some reason I was being conservative yesterday. Weird. I know.

I then set to the task of covering the bowl with the glued up paper scraps.  First of all, this seemed to take a rather long time, then because the scraps weren't wet enough, it wasn't working out so well, they weren't pliable enough. Still, I motored on...
Here we are at the beginning... 

I kept adding more and more scraps, trying to cover most of the bowl.  I put the heart shaped cut outs on there as well to add some dimension.  Really by this point, I was over it, but I wanted to finish.
I have nothing witty to say about
this picture.

It was then that I read the end of the directions...it could take "days" to dry. DAYS????? I don't have days. I have to blog. Fine. So I put it in front of a fan and went to work.  When I returned at 2am, it was sort of dry, so I plied it off of the red bowl and went to bed, figuring that I would be able to remove the fake saran wrap in the morning. 

And this is how it shall stay.
I guess I could use it
as a wall hanging.
No sirree bob. That stuff is not budging.  So there you have it.  My very first heart shaped crafting disaster. 

Friday, January 28, 2011

Hearts, Crystals & Vaseline...

I'm not really sure how this occurred, but one day a few years ago I ended up crystallizing  my tiny bottle of Vaseline.


Some people carry around glue sticks, others can't live without their hand cream, but for me it's Vaseline. So I crystallized it. It makes me happy, it makes others happy-yes, there have been haters over the years, but I don't care. I like my Vaseline.

That being said, a few months ago (ok, ten and a half) my sister gave birth to my very first neice (#2 is on the way, so this one was my very very first).  Now, let me just say that Lindsay (said sister) was a HUGE Vaseline hater. So imagine my surprise when she requests a crystallized version of her very own (well, not for her, for the niece)...Hmmm...Smuggly, I replied that OF COURSE (duh) I would make her one and I finally got around to it today.

I don't know if you kids have ever crystallized anything, but I have (big shock).  I order my crystals from MJ Trim and have for years. If you're ever wandering around NYC, they have a store front somewhere in Midtown (on 6th or 7th, maybe 6th...). They're great and over the last few years, their blog and their website have become even more fabulous.

This is a must.
When crystallizing, it is MAS IMPORTANTE (that's very important for you non-spanglish speakers) to choose the correct adhesive.  When I was growing up, my dad's favorite quote was, "The right tool for the right job." He was talking about fixing things and now I'm talking about crafting. Gem-Tac is THE BEST adhesive for adhering crystals. It is almost foolproof, trust me, one time I crystallized the back of my cell phone that I would sometimes use as a hand grenade and those little buggers never budged once. True story. Use the Gem-Tac, it works.

Anyway, I smoothed it over a small portion of the Vaseline container (I like it to get somewhat tacky before I put the crystals in it, that way they don't slide around and get all messy). Then I used a tweezer and one by one I placed them. I used a template to draw the heart on the package and then I outlined it with chocolate colored rhinestones (the rest of them are lavender).

How it looked when I started...
When did they change the packaging???
I was VERY upset...

About 1/4 of the way through


This actually took quite a bit of time, I would say almost two hours, but I finally finished and Voila!  A Crystallized Vaseline worthy of my niecey-poo!


I especially love the heart (of course) and the Vaseline logo (which is a must-we have to give credit where credit is due). 

Thursday, January 27, 2011

Accordion Valentines

In the spirit of this Valentine season, I ended up co-teaching a class at Paper Source with my friend Olivia.  It was super fun and we all had a blast. I love those crafting classes where the table gets really messy and there's stuff everywhere. It's what I call progress.

I love all this mess!


In the interest of keeping with the hearts theme (not exactly hard to do around Valentine's Day), I used two different kinds of Martha Stewart craft punches, a heart hole punch from P.S, some heart cards from P.S. and V-Day themed 12x12 papers. It was lots of fun! The final product ended up being an accordion valentine that fits into an A7 box mailer.  I made it pretty generic so that I can customize it for whomever I deem worthy enough to receive it...

I love all of the different heart punches that we used, they are FABULOUS. Martha Stewart is the queen of crafting and I aim to be her co-queen!

The end result is very long...

Wednesday, January 26, 2011

Crochet me a heart please!

I've known how to crochet for as long as I can remember knowing how to do anything. I think my Grandma Ginny taught me one summer when I was visiting her (I feel like she probably needed to keep me busy because I was being bad)...I remember crocheting little scarves for my dolls to wear during the winter when I was very very young. Anyway, this brings me to today's project...

I hoard and I admit it. I hoard paper and rubber stamps and ink pads and yarn. I've hoarded yarn for the longest though, so I have a ton of it hidden in secret and not so secret places all over my house. When I was single, I would store my yarn in my stove (next to my make up and magazines) because it wasn't used for anything else (very a-la Carrie from Sex and the City-at least I thought I was).

Anyway, so yesterday, I felt the need to further my yarn hoarding and I went to one of my favorite Houston places, The Texas Art Asylum. I discovered this place through one of my friends and then again on Facebook (you can find them there, right there up top at that link). I wandered in sometime this summer and was in crafting heaven. That place is amazing. They have a fabulous yarn stash (amongst many other things) and a lot of it is discontinued yarn that I MUST have (duh). So I popped in yesterday and picked up a few (7) things. Here is what I created today with some of them...


At the top left, the heart is made from Lion Brand Chenille (which unfortunately is discontinued and that really stinks because I love that yarn), clockwise, the light pink heart is made from a mystery yarn that I found at the Asylum, it has little sequins interspersed throughout it and it's amazing. The hot pink heart is pure cotton from Lily Sugar N Cream and the tiny little red heart almost blinded me. I made it out of red crochet thread that I had in my stash and the stitches are so tiny that I almost had to use a magnifying glass to finish it, but it's super cute and so super worth it. I'm felting a clutch and I'm going to use these to adorn it. I'll post a pic when I'm done with the whole thing.

Thanks for the comments ladies!  I think I have them enabled correctly, there shouldn't be anymore issues!

Tuesday, January 25, 2011

playing with magazines

First of all I have to start out by saying just how excited I am to have six official blog followers!  I know that there are many others out there following along as well and I am so grateful and honored to have just a lil bit of your attention each day!

Part of the reason that I started this blog was to have an excuse to try out a bunch of crafting techniques that I've read about/heard about/spied on etc. one of such said techniques comes from the book "Playing With Books" by Jason Thompson.  This is a really fabulous libro and I've been chomping at the bit to try some of this stuff out...Anyway, instead of using books, I snatched up one of Oprah's Magazine from December and quickly ripped out some pages.
Thank you Oprah for your contribution to my blog. I put your magazine to fabulous re-use.
Sorry that I forgot to photograph this part, but after I was done ripping, I took a paint brush and rolled each page from corner to corner, securing it with my favorite PVA glue. PVA is actually poly-vinyl adhesive and it's fast drying, strong and bendable.


I think I rolled 30 pages and then I glued them together side to side and let them dry for about half an hour.
It kind of looks like a big placemat doesn't it?

After they were dry, I used a heart shaped template and a sharpie to sketch onto the paper roll placemat.

sorry, this picture stinks a little...

Once that task was happily accomplished, I quickly pulled out my exacto knife and a box cutter.  Then the real drama started. The stupid thing broke in half!

NO BUENO!

I decided to muscle through it with both knives and eventually ended up reaching for my scissors to finish the job. It ended up breaking in several pieces eventually, but I just whipped out some more PVA and fixed it. 

Mucho No Bueno. 

I stitched it back up and Voila!  I actually kind of love it!  This is one of those hearts that I have no idea what I'm going to do with, but oh well...It's still cool.

Ignore my carpet please...I got sick of photographing things on the craft desk...

I have big plans for the rest of the week, so stay tuned!!!


Monday, January 24, 2011

Happy Anniversary Tater Hearts.

Today is my third wedding anniversary. Three years ago on a cloudy January day in Walt Disney World I married the love of my life!  While reminiscing about this glorious event last night, my friend Kristen suggested that I use the traditional and modern third anniversary gifts (crystal and leather) as my muse for today's heart. It was a good idea, but I couldn't wrap my head around it and in fact, this leathering crystal idea kept me awake all night (that's just ridiculous, i know)...

I decided to just let it go for today, thinking that some fabulous idea would pop up unexpectedly and so in celebration of the third year of our marriage, Mark and I decided that all you can eat pancakes at IHOP were a great way to start the day.

Imagine my surprise, as I'm wolfing down hash-browned taters, when my husband says, "You should make those into a heart." SCORE! I LOVE TATERS! This idea is more appropriate and special than anyone can ever know (or want to know really), so I set to my task...and Voila!  A tater heart!  The even funnier part, is that the waiter kept wanting to take away my plate and I was throwing him angry death glares as I photoghraped said heart with my iPhone...


Happy Anniversary Honey (he looks thrilled doesn't he?)!


Sunday, January 23, 2011

numero dos

After the husband had the gall to say, "We're not going to have hearts all over the house now are we???" I got all excited last night thinking of heart #2...A place to keep them all (or at least some of them, maybe even the vast majority...).

I woke up early and unrolled a beautiful piece of Lokta paper from Nepal that I've been not so secretly hoarding. I also had some gorgeous spare red satin book cloth handy and a Naked Binder (I hoard these as well, I have like seven of them-oops). Other things that I used include a methyl cellulose/pva glue mixture, a teflon bone folder, a ruler, an exacto knife, a pencil and a paste brush...

Lots of supplies, look at the pretty paper!
one side all glued up

with the binding on


The finished product...


I love naked binders. They are wonderfully green and can be customized in so many different creative ways.  This is the first time I used real book cloth on one of them though, I usually cheat and use the pre-adhesived (caryn word) type. Is that cheating? I don't think so, that stuff is SO MUCH EASIER to use and a lot less messy!

Tomorrow is my 3rd wedding anniversary, so I'm going to have to think of a super special heart of the day...until then!